 I knew I could never cope with one-a-day's worth of 9 patches and would have to tackle them in batches. I made a great start last week by cutting up a bunch of pre-cut squares, see here. Then I started to panic that Crazy Mom is already up to day 10 and I hadn't stitched a thing! Last night was the first time in days I'd been able to get to my machine and I managed to bowl over 16 blocks. At the moment I'm making two blocks from each set of fabric squares and reversing the colour order for the second block (ie. 4 of one colour, 5 of the other, then 5 and 4). That way they'll have a 'partner' in the completed quilt. It's obvious to me that I LOVE spots. They feature in all but two of these blocks so far! I think the trick is to get some real contrast happening within the blocks to make them stand out. I'm having fun....just hope my enthusiasm doesn't wain and the scraps hold out...54 to go!
Friday, July 31, 2009
Sixteen down!
I knew I could never cope with one-a-day's worth of 9 patches and would have to tackle them in batches. I made a great start last week by cutting up a bunch of pre-cut squares, see here. Then I started to panic that Crazy Mom is already up to day 10 and I hadn't stitched a thing! Last night was the first time in days I'd been able to get to my machine and I managed to bowl over 16 blocks. At the moment I'm making two blocks from each set of fabric squares and reversing the colour order for the second block (ie. 4 of one colour, 5 of the other, then 5 and 4). That way they'll have a 'partner' in the completed quilt. It's obvious to me that I LOVE spots. They feature in all but two of these blocks so far! I think the trick is to get some real contrast happening within the blocks to make them stand out. I'm having fun....just hope my enthusiasm doesn't wain and the scraps hold out...54 to go!
Thursday, July 30, 2009
Rolley poley thank you
 This is a little roll of Denyse Schmidt 'Katie Jumps Rope' fabric that I made for Clare to say thank you for taking me to see French & Saunders last night. (They would say "rolley poley" too, wouldn't they?) The naughty girl wouldn't accept anything for the ticket and with both our work and family commitments we ran out of time to have dinner before the show so I gave her something she couldn't refuse.... a little bundle of fabric that I knew she didn't have! Thank you Clare....I hope you enjoy the fabric as much as I enjoyed the show!
And here's the newest member of the family - R's Mr Potato Head. Let's see how he gets on over the next few weeks! (Currently he looks like I feel.... a bit seedy.)
Tuesday, July 28, 2009
Belated birthday bash....
 R's birthday was back in April and at the time we were on holidays in QLD. Being the negotiator that she is, R asked if she could have her birthday party in July to coincide with the release of 'Harry Potter & the Half Blood Prince' movie. I thought it was a good idea at the time....one less thing to do back then! Then the guest list surfaced. 14 girls.....in our tiny house! Oh, she does it to me every time but do you know what? It always works out and it's always fun. So after the movie these lovely girls headed back to our house for birthday high tea with a Harry Potter twist. Spider web, blood red and snake cakes, 'Honeydukes' toffees and crackles, choc coated 'coakroaches', sour worms, butter beer and take-home 'Bertie Botts Every Flavour Beans'. It was magic!
Thursday, July 23, 2009
More 2 1/2" loveliness
Crazy Mom has decided to run another one a day 9 patch virtual quilt along and seeing as I missed out last time, I thought I'd tag along. My enthusiasm seems to wain with quilt alongs (I still haven't quilted my Old Red Barn quilt!) but I loved the outcome of her previous one a day and I have lots 2 1/2" strip scraps so I have nothing to lose!
I thought the best method for me would be to cut a whole bunch of squares, mentally noting what fabric goes with what other fabric and then I could piece them in batches. Seeing as I work and as much as I'd love to see my sewing machine out full time (or have a dedicated sewing room....wouldn't that be bliss?), I'm not going to be able to manage one a day but rather batches of patches. I've spent the last couple of nights cutting and I just love these little squares all packed in this lunchbox. It never ceases to amaze me that little bits of fabric once joined become one swathe of fabric. Gorgeous.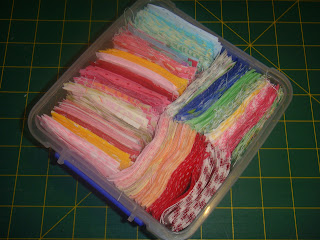 I've also finished the quilting on my 2 1/2" experimental quilt. I love the finished quilting...still a few threads to tie off. I 'ummed and arrgh'd' over the binding and finally decided not to spend any more money on the experiment and chose something from the stash. Sadly, it's too white against the calico. But seeing as it's an experiment and will probably either be a give away or shack quilt, I'm not fussing. Here it is all pinned and ready for the hand stitching.
 And speaking of the stash, here's a pic of R's old wardrobe. It's having a make-over! I've taken the doors off, removed the daggy odd mirror panels that I always hated and am having glass installed. I've ordered cornicing for the top and Joe made some shelves. This old wardrobe is now my quite tidy fabric stash cupboard! Let's see how long that lasts! Oh....and there's lots more room for more fabric too!
I thought the best method for me would be to cut a whole bunch of squares, mentally noting what fabric goes with what other fabric and then I could piece them in batches. Seeing as I work and as much as I'd love to see my sewing machine out full time (or have a dedicated sewing room....wouldn't that be bliss?), I'm not going to be able to manage one a day but rather batches of patches. I've spent the last couple of nights cutting and I just love these little squares all packed in this lunchbox. It never ceases to amaze me that little bits of fabric once joined become one swathe of fabric. Gorgeous.
I've also finished the quilting on my 2 1/2" experimental quilt. I love the finished quilting...still a few threads to tie off. I 'ummed and arrgh'd' over the binding and finally decided not to spend any more money on the experiment and chose something from the stash. Sadly, it's too white against the calico. But seeing as it's an experiment and will probably either be a give away or shack quilt, I'm not fussing. Here it is all pinned and ready for the hand stitching.And speaking of the stash, here's a pic of R's old wardrobe. It's having a make-over! I've taken the doors off, removed the daggy odd mirror panels that I always hated and am having glass installed. I've ordered cornicing for the top and Joe made some shelves. This old wardrobe is now my quite tidy fabric stash cupboard! Let's see how long that lasts! Oh....and there's lots more room for more fabric too!
Monday, July 20, 2009
Walk a mile with my walking foot
Up until now I've been very reluctant to quilt using a walking foot. It stems from my early attempts at quilting with my old Husqvarna with a regular foot. Scary, high heart rate, lumpy, bumpy, irregular stitch length quilting! I'm surprised I'm still interested in quilting after those early days!  Whilst I was up to my armpits (any one who quilts knows that's really true!) in quilt top, R decided that she was bored on the last day of the holidays and wanted to cook something. The outcome? Bill Granger's Cherry Tart. She did it all herself leaving me to my sewing. I'm so proud of her and it didn't taste half bad either. Perhaps our own little masterchef in the making?
But my friend Kay who's just started quilting a few weeks back and like me is completely self taught from books and the internet exclaimed how easy it was. So my little 2 1/2" square checkerboard quilt is experiencing yet another experiment.......straight line quilting using a walking foot and I have to say, Kay is absolutely right. The walking foot is great! I don't know what I was afraid of!
Whilst I was up to my armpits (any one who quilts knows that's really true!) in quilt top, R decided that she was bored on the last day of the holidays and wanted to cook something. The outcome? Bill Granger's Cherry Tart. She did it all herself leaving me to my sewing. I'm so proud of her and it didn't taste half bad either. Perhaps our own little masterchef in the making?Tuesday, July 14, 2009
I'm dreaming of.....
 little 2 1/2" squares and have had them running around in my head for weeks. So much so, I had to do something about it so a quick quilt experiment was in order. Mind you, don't assume that because a quilt is small, it's going to be quick! That was lesson 1.
I extracted 6 x jade colour strips from my existing Moda Sweet jelly rolls. I have two, so that gave me 12 strips each 2 1/2" wide. I pieced each strip with a 2 1/2" strip of calico. Then I cut each set of strips into 2 1/2" wide rectangles. Then I matched each rectangle with an upended partner to give me a square checkerboard block made up of 4 x 2 1/2" squares.
I laid them out as 8 blocks x 12 blocks and because my colours were limited, I opted for a patterned repeat rather than random mixing. That's where lesson 2 comes in. I really think an odd number would have given me a better size. Perhaps 9 blocks across x 11 blocks deep would have given me a squarer top rather than rectangle. So I should have tried a few more ways before I started stitching and of course, the size ends up completely different once stitched than when it was laid out on the floor!
I've almost finished piecing the blocks and will add to the sides with left over calico to square it up and maybe the top.
Lesson 3. It will still be gorgeous even if it's not exactly right and the next one will be even better!
Tuesday, July 7, 2009
Around this colourful world....and back
 A built in wardrobe is being installed in R's room. It's white and it's huge....compared to the antique one she currently has. Old wardrobes are gorgeous but they're just not deep enough to hang a hanger. We're kind of hoping that this new efficient hanging space will result in a tidy room. (Here's hoping!)
Coupled with this, R decided that she didn't want a pink room any more so a paint job pre-wardrobe install was required.
Her request was a white room with red accessories. I stopped her at the red feature wall ....who knows when she'll change her mind again!
Her request was a white room with red accessories. I stopped her at the red feature wall ....who knows when she'll change her mind again!
We picked up a bargain tin of white paint and started de-pinking. But the result was less than impressive. Way less. In fact, down right horrible.
Reason. Antique white woodwork looking virtually puce against the whiter than white walls.
My wise friend Kay offered this piece of advice. "It's easier to change the colour of the walls than the woodwork." Right there with you Kay, seeing as I was the one that had painted the woodwork in the first place.
Joe knows his daughter well and declared "that if you're going to change the colour you better get R's approval". (I think he was also washing his hands of the whole matter!)
R said it was fine as it was but she's an Aries and therefore extremely impatient.
So we trundled off to Solver and checked out the big colour swatches. We headed for the antique white swatch. And R declared that she liked the 'white' placed next to it. This delightful swatch is called 'Creamstone' and yes, it's a lovely classic pale cream. How do I know this? Because it was the colour on the walls before we painted them pink! Gotta laugh or you'd cry!
Friday, July 3, 2009
A lesson in contrast
 I now understand what people mean when they talk about contrast and mid tones.
Over the past few months I've been collecting fat quarters of Amy Butler's Midwest Modern range and as a little pile of folded fat quarters they look wonderful together. Late last week I decided that I finally had enough to make a quilt and I used this one as inspiration. (Funnily enough, Amandajean made a comment about contrast in her blog....I should have made a note of that!)
After piecing it together I found myself really quite disappointed. The technique is great, my seams are perfect but it's just.....boring. It's because the fabrics are all the same density, they're almost fighting. They're still all lovely but in this quilt top pattern I don't believe they're working as well as they could have in some other format. I think they would have been better in something like the Old Red Barn's strip patches....even Amy Butler's own Mid Mod quilt or even as a block party with extra borders.
Don't get me wrong, it's not headed for the bin. I'll finish it and it will be lovely. I just won't be in love with it.
Subscribe to:
Comments (Atom)