I have had these little fabric strawberries cut out since last December and seeing as they were lying in the cupboard unfinished, I thought it would be a good opportunity to finish them up for the forthcoming market. I managed a dozen! I used the free pattern on Martha Stewart's website but adapted the top to make them more strawberry-ish. They are so cute and the perfect mini pincushion when you need one for just a few pins at a time.
Saturday, July 6, 2013
Saturday, June 29, 2013
Tweet tweet....
I've been making little birds for a forthcoming market. I love how these
lovely little creatures can be made out of small fabric off-cuts. I've
had so much fun mixing prints to create bodies and wings that contrast
and match.
If you'd like to make your own, follow this link over at Sew Mama Sew or check out more of Kajsa's work at her blog, Syko. Tweet, tweet..... I'm linking up with Crazy Mom because this is such a fantastic finish for this Friday!And here's a picture I shot of some of my quilts....just because!
Friday, June 14, 2013
There's always hope....
When it comes to quilting, things don't always turn out the way they were originally envisioned. Even after all the blog-land inspiration and the mountains of book and pattern referencing and the zombie like state quilters take on whilst their thoughts wander because they're in the 'I've got this idea in my head' zone. Which is then followed by the 'play around block' which accounts for a bit of sewing energy and lots of experimental fabric play. Sometimes that can even lead to the full piecing stage. I've also been known to get to the quilting stage and still manage to birth a complete disaster. This accounts for the numerous 'problem children', at varying stages that live in my quilt cupboard.
Don't get me wrong...there are lots of positives but sometimes things don't always go to plan and well....this story WAS one of the negatives.
I fell hopelessly in love with Denyse Schmidt's Hope Valley as soon as it was released. It was almost a fever having been at the complete outer of her earlier Flea Market Fancy and Katie Jump Rope releases and spending way more than I should have to acquire whatever I could because I was suffering from acute HAVE TO HAVE fabric addiction. (I'm still debating about writing a thesis on the buyer behaviour of fabric consumers who are at the tail-end of a popular release but that's another post...). So, because of my past DS fabric purchase indiscretions, I maintained a modicum of restraint and purchased just a fat 1/4 only of each of the Hope Valley range.
Before cutting, I scoured every book I owned and numerous flickr images for the perfect pattern and settled on half square triangles set in Kona Ash....AKA Kaffe Fassett 'Simple Shapes, Spectacular Quilts' - Clay Tiles or Indigo Points.
However, in my haste to produce the perfect quilt using the perfect fabric, I omitted the trimming stage. I was an impatient newbie on a steep learning curve to completion and I learnt a very big lesson and that is .....don't cut corners. Or should I say, do cut corners and do trim!
So the short of all this is that what I had made was a disaster. My seams were disgusting, nothing aligned, my corners were lumpy bumpy and my fabric investment that I carefully cut from premium priced fabric was on the pile of shame, thrown to the back of the cupboard.
I learnt that lesson over and over after that attempt. Every block I made that was trimmed made a beautiful quilt. Every one that was not trimmed, didn't. Where is this going? Well, I pulled that precious Hope Valley conglomeration from the back of the cupboard (which is sounding more and more like Narnia over the years) and pulled it apart. I sat on the couch one night and stripped it back from 16 unit blocks... to single 1/2 square triangles.
Now back to basics, I re-made the concept. It's a bit like starting afresh but with a head start! This time I sashed the poorly made 1/2 square triangles with 2.5" strips and voila a better square than before which made trimming spectacularly simple.
I've only used a small portion of the previous 1/2 square triangle shamozzle, edged it in my remaining Kona Ash (of slightly different die-lots) and re-built it into quite a lovely cot sized quilt of 40" x 50" in the style of Alison from Cluck Cluck Sew (Modern Quilts from the Blogosphere).
Now the possibilities of much improved quilts for the remaining blocks are endless.
This version is backed with more Hope Valley, Diamond Dandy in Fiesta and the binding is the Canyon Stripe in Piney Woods.
And speaking of birthing babies...in a round-about fashion, my baby is 12 today. Where has that time gone? Needless to say, he is made from the perfect pattern and continues to amaze us all! Happy B-day L!
Another wonderful finish it up Friday to link!
Don't get me wrong...there are lots of positives but sometimes things don't always go to plan and well....this story WAS one of the negatives.
I fell hopelessly in love with Denyse Schmidt's Hope Valley as soon as it was released. It was almost a fever having been at the complete outer of her earlier Flea Market Fancy and Katie Jump Rope releases and spending way more than I should have to acquire whatever I could because I was suffering from acute HAVE TO HAVE fabric addiction. (I'm still debating about writing a thesis on the buyer behaviour of fabric consumers who are at the tail-end of a popular release but that's another post...). So, because of my past DS fabric purchase indiscretions, I maintained a modicum of restraint and purchased just a fat 1/4 only of each of the Hope Valley range.
Before cutting, I scoured every book I owned and numerous flickr images for the perfect pattern and settled on half square triangles set in Kona Ash....AKA Kaffe Fassett 'Simple Shapes, Spectacular Quilts' - Clay Tiles or Indigo Points.
However, in my haste to produce the perfect quilt using the perfect fabric, I omitted the trimming stage. I was an impatient newbie on a steep learning curve to completion and I learnt a very big lesson and that is .....don't cut corners. Or should I say, do cut corners and do trim!
So the short of all this is that what I had made was a disaster. My seams were disgusting, nothing aligned, my corners were lumpy bumpy and my fabric investment that I carefully cut from premium priced fabric was on the pile of shame, thrown to the back of the cupboard.
I learnt that lesson over and over after that attempt. Every block I made that was trimmed made a beautiful quilt. Every one that was not trimmed, didn't. Where is this going? Well, I pulled that precious Hope Valley conglomeration from the back of the cupboard (which is sounding more and more like Narnia over the years) and pulled it apart. I sat on the couch one night and stripped it back from 16 unit blocks... to single 1/2 square triangles.
Now back to basics, I re-made the concept. It's a bit like starting afresh but with a head start! This time I sashed the poorly made 1/2 square triangles with 2.5" strips and voila a better square than before which made trimming spectacularly simple.
I've only used a small portion of the previous 1/2 square triangle shamozzle, edged it in my remaining Kona Ash (of slightly different die-lots) and re-built it into quite a lovely cot sized quilt of 40" x 50" in the style of Alison from Cluck Cluck Sew (Modern Quilts from the Blogosphere).
Now the possibilities of much improved quilts for the remaining blocks are endless.
This version is backed with more Hope Valley, Diamond Dandy in Fiesta and the binding is the Canyon Stripe in Piney Woods.
And speaking of birthing babies...in a round-about fashion, my baby is 12 today. Where has that time gone? Needless to say, he is made from the perfect pattern and continues to amaze us all! Happy B-day L!
Another wonderful finish it up Friday to link!
Friday, June 7, 2013
Trip the light fantastic....
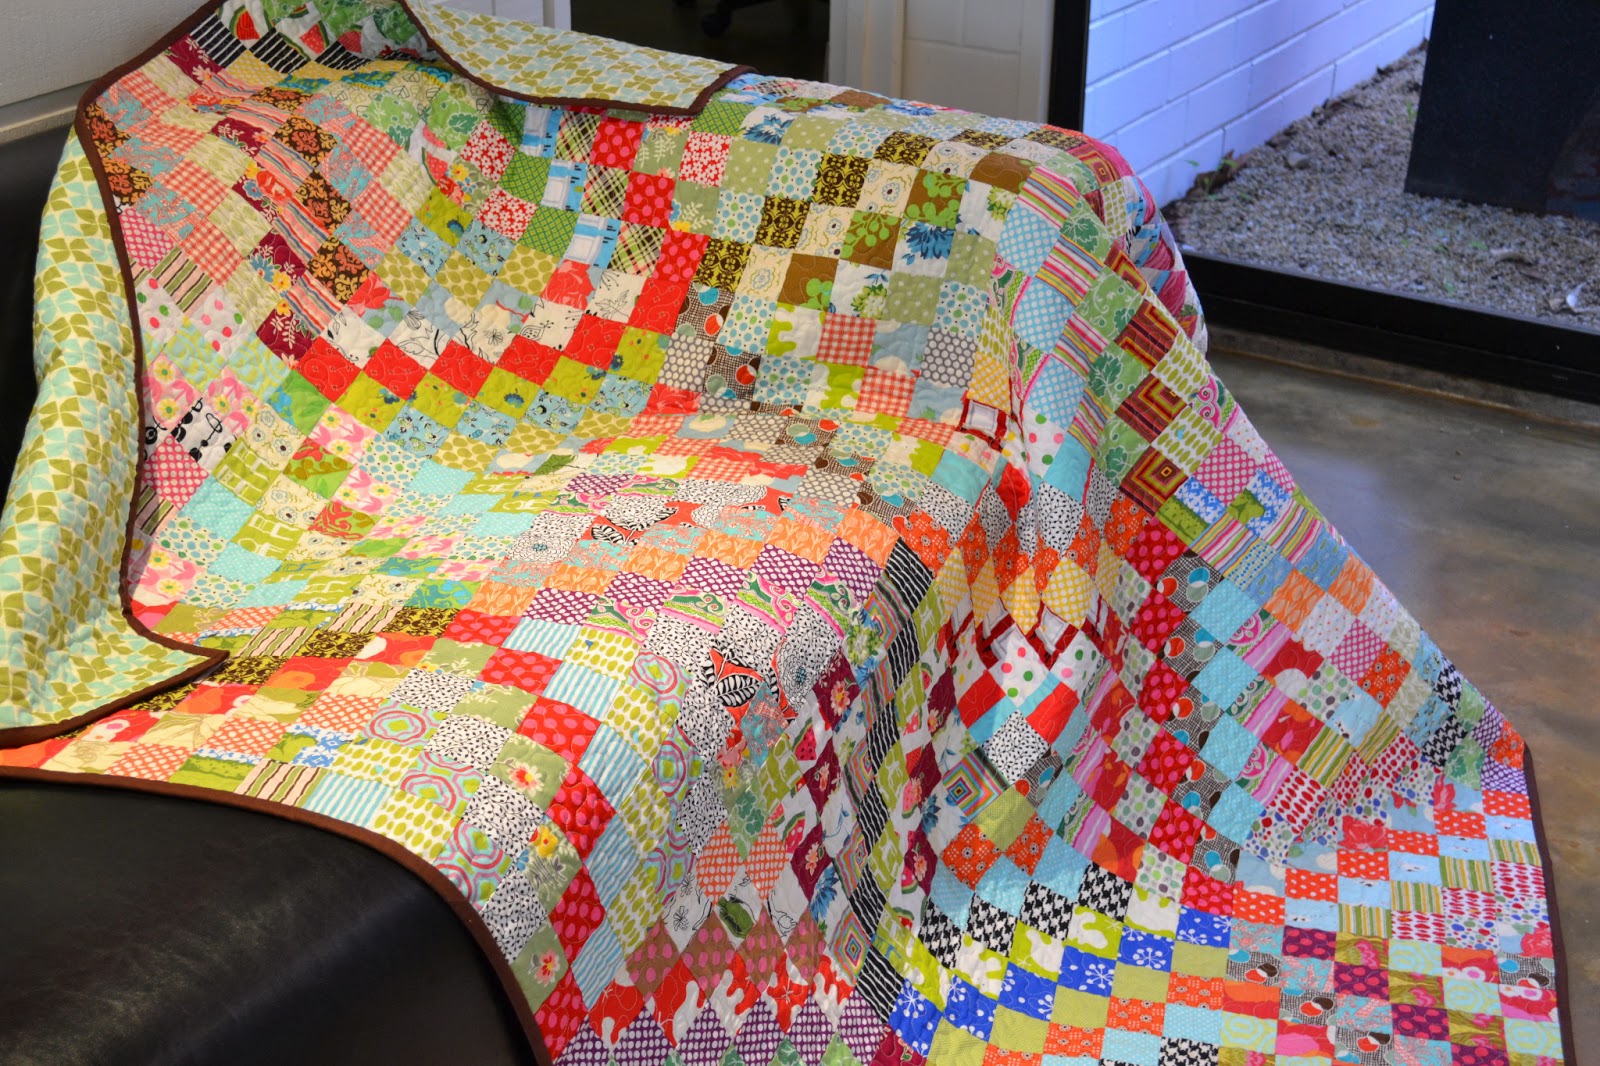
After a giant leap into the new year with a Scrappy Trip Around the World back in January...(just like quite a few of us!), the rate of progress slowed to a virtual snail pace leaving the quilt top languishing for a while. Mind you, I wasn't ignoring it...I just had a few study issues to sort out like major assignments and exams! Now that they're over for the moment and seeing as this quilt is intended for someone special by July, I thought I'd better get myself into full throttle and finish this little beauty up.
The intended loves green and her room features a lot of saturated rainbow colours. So each block has a bit of green. I know this quilt is known as 'scrappy' but I can assure you, to get the desired look I cut into quite a few horded fabrics.
I debated about how to quilt, almost deciding to attempt some dogwood or orange peel effect but fell back to the trusty stipple. As part of the process, I quilted one block row at a time, moving to the left, right and down, then up. That probably doesn't make a great deal of sense but it was a wonderful way of keeping the quilt moving evenly. The other bonus was that working with the 2" frame, the stipples are very evenly sized and quite dense. I'm thrilled with it!
Because of the mesh of colours and prints I decided to keep the binding really simple and went with a solid chocolate which works wonderfully framing the backing which is a Bonnie and Camille, lime and aqua from thier Vintage Modern range.
A lovely finish for this week and linked up with Crazy Mom's Finish it up Friday.
The intended loves green and her room features a lot of saturated rainbow colours. So each block has a bit of green. I know this quilt is known as 'scrappy' but I can assure you, to get the desired look I cut into quite a few horded fabrics.
I debated about how to quilt, almost deciding to attempt some dogwood or orange peel effect but fell back to the trusty stipple. As part of the process, I quilted one block row at a time, moving to the left, right and down, then up. That probably doesn't make a great deal of sense but it was a wonderful way of keeping the quilt moving evenly. The other bonus was that working with the 2" frame, the stipples are very evenly sized and quite dense. I'm thrilled with it!
Because of the mesh of colours and prints I decided to keep the binding really simple and went with a solid chocolate which works wonderfully framing the backing which is a Bonnie and Camille, lime and aqua from thier Vintage Modern range.
A lovely finish for this week and linked up with Crazy Mom's Finish it up Friday.
Wednesday, May 29, 2013
Happy trails....
Happy trails indeed!
This little quilt-in-the-making is destined for a brand new little baby boy who lives in the UK. A second baby for our dear friends who are now firmly entrenched in Surrey.
Seeing as I made quilts for their first baby L, it's only fitting that baby E gets one too. What's even better is that we get to deliver it in person later this year!
I've used Happy Trails which is a really old line by Benartex that features all things cowboy including some very sweet but politically incorrect cowboy guns and barbed wire (...hope you don't mind Rache!). I picked various bits of the line up on a trip to Tasmania years ago and they've been waiting for the right aged little person.
Added to the mix are a number of other bits from the stash in blue, red, yellow and green and some solids in co-ordinating colours to create some reversed out maverick stars. I cut 3.5" squares with 2.5" squares for the triangle points. Each block is around 9" and I'v worked on a 5 x 6 block layout which will finish at a nice little cot size of around 45" x 54". Yee-hah cowboy!
This little quilt-in-the-making is destined for a brand new little baby boy who lives in the UK. A second baby for our dear friends who are now firmly entrenched in Surrey.
Seeing as I made quilts for their first baby L, it's only fitting that baby E gets one too. What's even better is that we get to deliver it in person later this year!
I've used Happy Trails which is a really old line by Benartex that features all things cowboy including some very sweet but politically incorrect cowboy guns and barbed wire (...hope you don't mind Rache!). I picked various bits of the line up on a trip to Tasmania years ago and they've been waiting for the right aged little person.
Added to the mix are a number of other bits from the stash in blue, red, yellow and green and some solids in co-ordinating colours to create some reversed out maverick stars. I cut 3.5" squares with 2.5" squares for the triangle points. Each block is around 9" and I'v worked on a 5 x 6 block layout which will finish at a nice little cot size of around 45" x 54". Yee-hah cowboy!
Saturday, May 18, 2013
X-cited
Oh yes indeed, I'm very excited to share my finished X-Plus quilt. I had finished 14 blocks some time back and was on a mission to finish things up. But 14 wasn't enough so I bashed out another two. Then I didn't care for this quilt as a square so made another four to finish with 20 as a 4x5 layout.
The quilting is straight line and it runs across the horizontal lines. Its simplicity works with the busy scrappy fabrics and not over quilting leaves the quilt quite supple.
I followed this tutorial but adapted my blocks to suit 2 1/2" strips which I always have an abundance. The size of my components are:
Centre cross 1 - 6.5"x2.5", 2 - 2.5"x2.5"
Edges of cross 4 - 2.5"x2.5"
Background triangles 8 - 2.5"x2.5"
Branches 4 - 4.5"x4.5"
This builds a block that's around 10" finished.
Another lovely finish it up Friday to share....I can't believe I've managed two in one month!
The quilting is straight line and it runs across the horizontal lines. Its simplicity works with the busy scrappy fabrics and not over quilting leaves the quilt quite supple.
I followed this tutorial but adapted my blocks to suit 2 1/2" strips which I always have an abundance. The size of my components are:
Centre cross 1 - 6.5"x2.5", 2 - 2.5"x2.5"
Edges of cross 4 - 2.5"x2.5"
Background triangles 8 - 2.5"x2.5"
Branches 4 - 4.5"x4.5"
This builds a block that's around 10" finished.
Another lovely finish it up Friday to share....I can't believe I've managed two in one month!
Friday, May 10, 2013
Indian Summer....
It's been really warm this week with temperatures hovering between the mid to high 20's, record temperatures for May and a bushfire in the hills this morning. In MAY! I heard someone say the other day that we now have two seasons. Summer and not quite Summer. So even with the leaves changing colour and falling to ground this balmy weather has obviously influenced the colour pallet for this little baby quilt. A simple half square triangle quilt featuring pinks, greens, blues, brown and yellow from 5" squares. Let me indulge you.....
There are some of my all time favourite fabrics and designers in this quilt, Bonnie & Camille, Heather Bailey, Amy Butler, Sandy Henderson, Denyse Schmidt, Paula Prass a whole bunch of 'I can't remember' and some Spotlight. The back is a cherry print that I found on the end of roll at Spotlight. It's a cotton dress fabric but I couldn't leave without it. It's been in my cupboard just waiting for a little girl quilt. The binding is also a Spotlight fabric, a dotty dot in hot pink and white.
The quilt is stippled and finishes at around 30" x 35"....give or take!
This quilt is a gift for Joe's boss whose wife has just had their second baby, a little girl.
A very pretty finish it up Friday!
There are some of my all time favourite fabrics and designers in this quilt, Bonnie & Camille, Heather Bailey, Amy Butler, Sandy Henderson, Denyse Schmidt, Paula Prass a whole bunch of 'I can't remember' and some Spotlight. The back is a cherry print that I found on the end of roll at Spotlight. It's a cotton dress fabric but I couldn't leave without it. It's been in my cupboard just waiting for a little girl quilt. The binding is also a Spotlight fabric, a dotty dot in hot pink and white.
The quilt is stippled and finishes at around 30" x 35"....give or take!
This quilt is a gift for Joe's boss whose wife has just had their second baby, a little girl.
A very pretty finish it up Friday!
Subscribe to:
Posts (Atom)